The very first lines of code you write when exploring a new programming language or tool—whether it’s Arduino C, MicroPython, VB6, C#, Python 3, or any microcontroller framework—mark the beginning of your coding journey.
Just like in the beginning, when God spoke light into the darkness, every journey with a new programming tool starts with a simple spark — the first words you write: “Hello World.” Whether it’s Arduino C, Micro-Python, VB6, C#, Python 3, or frameworks for any micro-controller, those two words mark the moment light pierces through the unknown.
This is the universal genesis for coders — the initial breakthrough when the invisible becomes visible, when learning transforms into creating. I’ve seen this simple phrase come to life on countless LCDs and sleek OLED displays, powered by Raspberry Pi, ESP32, or Arduino boards. Projects that began with this modest greeting have grown, scarred, and strengthened over time — much like life itself.
In the spirit of openness and connection, I greet you with “Hello World.” It feels incomplete to create and not share the story — the triumphs, the scars, the strengths — with anyone who might find inspiration across the globe. This blog is a testament to that journey, from first words to lasting impact.
The Image idea:
A dark, cracked stone slab glowing from deep within, with light breaking through the cracks forming the words “Hello World.” Above the slab, faint outlines of a hand reaching down (like the hand of God from the Genesis creation fresco) seem to ignite the glow. Around the slab, subtle imagery of microcontrollers, LCD/OLED screens, and digital code streams blend into the background, symbolizing the intersection of creation, learning, and technology emerging from the darkness. The overall vibe is one of raw, rugged strength born from imperfection — scars illuminating the path to mastery.
I have always loved the notion of all things powered by batteries.
This love dates back to about 2004 when a buddy and I decided that we would take a pick-up truck (called a ‘Ute’ in Australia or a ‘bakkie” in South Africa) and fill the load box with forklift batteries.
We knew we didn’t want to go through the pain of importing a low cost version of an electrical vehicle from China, back then. See the hoops you have to jump through to do that (needless to say you also need very deep pockets). Bureaucracy of importing a new car into Australia
So we decided to keep all aspects of the car ‘as-is’ and only change the motor out for an electrical motor plus ancillaries (retaining even the gearbox, differentials, etc, etc).
We had an electrical company donate a 90kW, 310Nm induction electrical motor and matching variable speed drive (VSD) and bought much of what else we needed to prove the EV concept.
I designed the whole control system using a Siemens PLC with imputs from a rheostat mounted to the accelerator footpeddle. It was all very elegant by its sheer simplicity. Needless to say, us two engineers ran out of money for this audacious project, at a time where Tesla was only pretty much starting out.
I like to tell myself that if the chips had fallen another way, my buddy and I would be the actual Tesla founders….who knows!
I also had an idea about something like Amazon back in 1997, which myself and another group of buddies called ‘Fantasia Digital Mall’. As you can see, there is no shortage of original ideas with me. I needed to do a MAP and an MBA before I realised I needed to raise Series A funding to get them going…
Anyway, lost opportunities aside, batteries now cost US$200/kWh, as seen by the following article:
There is no limit on sizes that can be achieved, and the power densities (watts/kg) are also up significantly, maybe it is time to dust off my designs from 2004 for a Tesla beating EV 😀
Ok, so fast forward to last year, let me see how I have faired with crowdfunding some other ventures to get on the path to my Series A investment 🤣
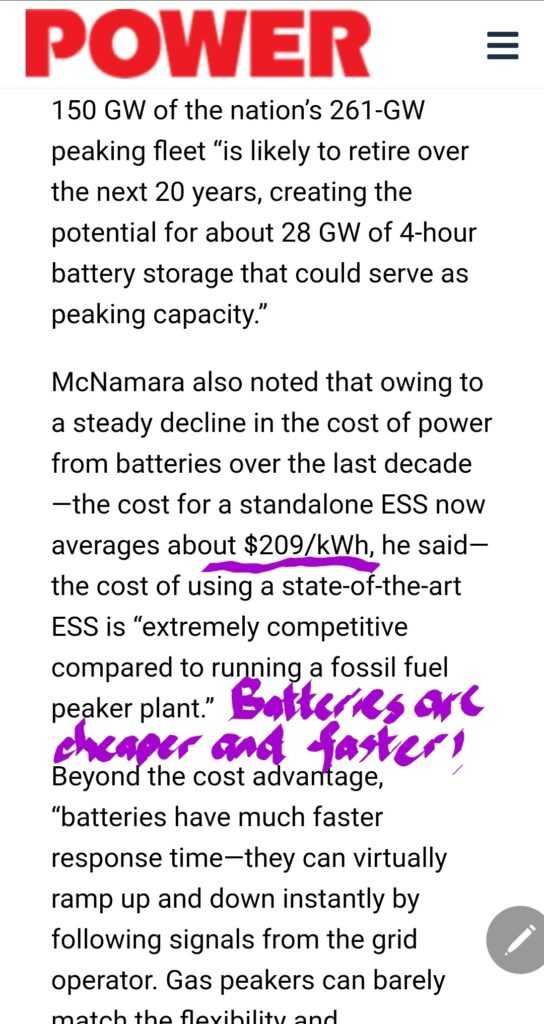
I figured out how to make protein powder at home. I made a biltong machine and dried the meat very dry, and then ground it up into a fine powder. It is fantastic when spread on bread. There is a club that makes biltong and jerky sandwiches with a range of great ideas, see:
I ran an Indiegogo campaign to get people to buy a kit for making their own biltong machine. This can then be sliced and eaten directly or allowed to get very dry and ground up, and this is how to make protein powder. Biltong is one of the best sources of protein, especially when made with deer or any other low-fat meat.
If you want to see a video on how to build a machine, watch the following video that I made:
Warning: When connecting electrical equipment in do-it-yourself (DIY) machine it is important to have an electrician do the final testing and energisation. There are a number of posts on this blog about making your own protein at home by focusing on making biltong. The key is that you buy buying suitable cuts of meat and then curing them to make biltong gives you high-quality protein, and the cost is not exorbitant.
In Australia there are a couple of high-quality places to buy meat which are not exhorbitant, see:
If you can’t find an electrician for the final hookup, testing and energisation, you can still make protein at home. Here is how: there are machines available on-line as follows: they cost about $400, whilst making one at home will only cost you about $60.
https://amzn.to/45KniCj – is the link to go to the product page for the above biltong machine.
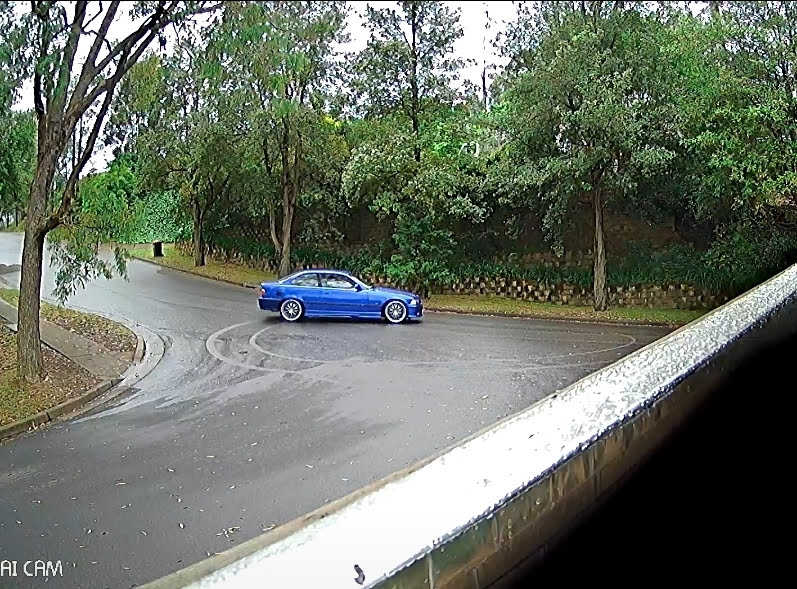
Today I heard an awful screeching of tyres near my fence. I immediately jumped onto my AI CCTV footage and caught this hoon (a colloquial term for a road hooligan)…one day he is going to overcook it and come through my pool fence. I just hope and pray that nobody will be home swimming when he does. Point is, it is a very expensive car driven by somebody with very little common sense, see a screenshot from the video here:
A “Hoon” (a hooligan) doing “donuts” in a busy intersection – genius!
Notice the spin tracks after one revolution by this hoon caught on video.
As usual this got me thinking, this time about Robert Kyosaki’s book and the lesson in that book, which is that – rich people aren’t necessarily the brightest in society.
Take this fellow in the photo below he told me that he does “concreting” for a living, which requires a 6 month certificate to enable a person to do that in Australia. I consider myself a reasonably educated person, I am an Engineer with 2 master’s degrees and a Ph.D but I am not rich in the financial sense (a bit like Robert Kyosaki’s one father in his celebrated book entitled, Rich Dad, Poor Dad). This tradesman is clearly doing well and ‘good on him‘ for that (no ill feeling from me – only respect for what he has accomplished in one area of life). However, the point is, never assume that somebody driving a brand new Ferrari is a brain surgeon or a high-powered invest banker, etc. Wealth thus has very little to do with ones intelligence or common sense. A good lesson to bear in mind.
Let’s see you might have guessed on of the following:
* Facebook’s artificial intelligence algorithm that feeds off people’s desires only to serve them a stronger dose of what they want. Watch The Social Dilemma Doco on Netflix to understand what I am referring to.
Actually you would be completely mistaken it is actually the power network! You didn’t think of that as a first guess right? Well it is, based on the mathematical models that describe it and the very complex interactions of everything that connects to it.
Just a small portion of the mathematics that describes the functioning of the power system
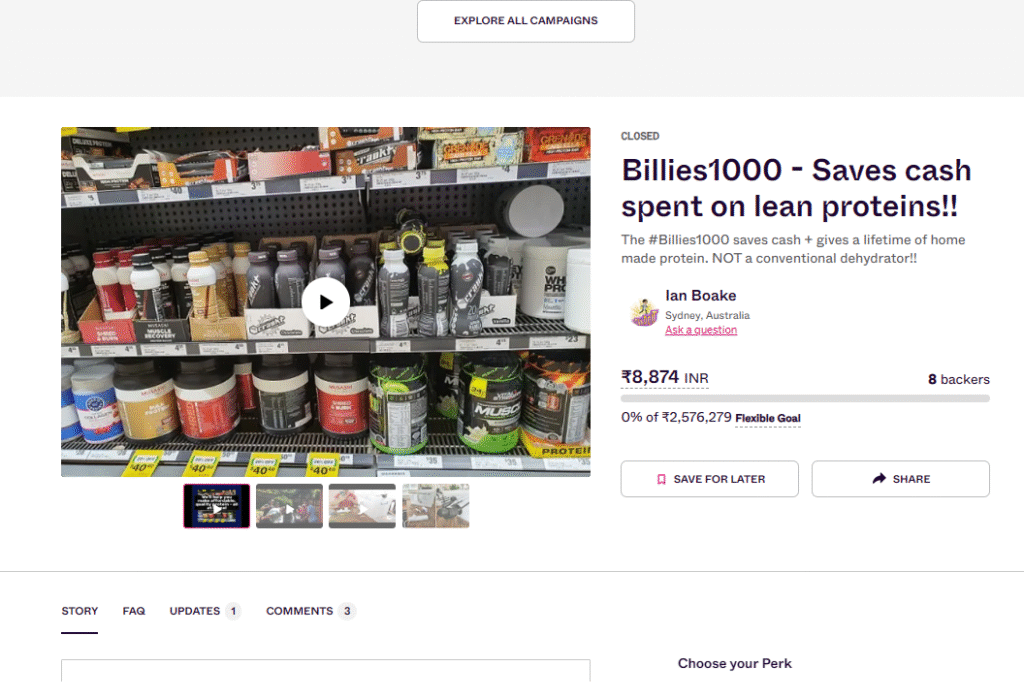
You may no doubt have been following all the food desiccator evolutions on this blog!
We started by putting a incandescent heat lamp and a desk fan in a plastic box with some holes drilled therein for ventilation, this was revision 1. The latest unit uses a bathroom venting fan and complimentary vent plus Arlec Bluetooth hub+temp&humidity sensor + switched plug socket. This all in a food grade plastic box with a basket that fits snuggly therein from which to hang the paper-clips. Recall these were bent into an S-shape for hanging up the meat to make either Biltong or Jerky.
The basket can have some aluminium fly-screen laid into it or shade-cloth laid into that basket and then fruit can be laid thereon to dry. I did that with a couple of sliced bananas and think this is my second most favourite snack, after biltong!
Yummy dried banana on a shade cloth laid in the basket.
The ‘secret sauce’ controller is a controller that can switch the heat source every few seconds, giving better control in making your dried foods. It also allows all interactions via Bluetooth from your mobile phone and if you connect to your local Wifi will show progress on a webpage, how cool is that! It also uses RF to control a plug socket so no electrical connections required. This is the state-of-the-art. If you want to buy a plug and controller it costs $100. Leave a comment we will get your details for an order. You are really going to love it! 👍🌟🍌
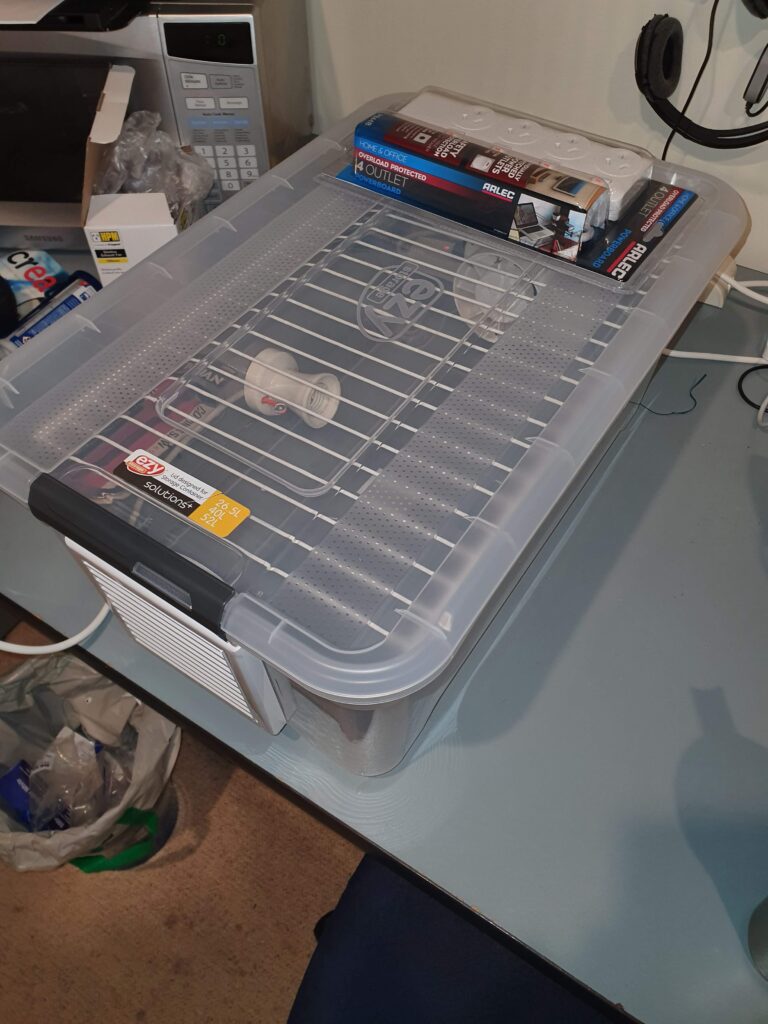
The next evolution of kit for building your own machine at home (available from your local hardware store)
Many folks are intimidated by the electrical aspect of making their own machine, rightly so it is a silent killer. This post is for such people. Get the fellows at the hardware store to fit a lamp holder with a plug socket as well as to the fan. All you need to do is cut a hole in the plastic box for those sockets to reach an external socket adaptor. Thus no wiring just a bit of assembly.
It is important to find a basket or rack that fits snugly into the box for either resting the fruit on or hanging the meat from, as below.
A nice snug rack onto which some flyscreen can be placed for drying fruit
I recently found a ceramic bulb of 100 watt heating capacity. This works in high humidity environments. Note: The Grid Connect controlled socket – the one with “Smart Plug-in Socket” printed on the box within the above picture, is the one used for this heat source in this machine. The fan remains on during the duration of the process to vent out the moisture that is drawn out by the heat source – this is what the desiccation, or dehumidification is all about.
A very good heating source for the dehumidification process.
This just keeps getting better and better as technology advances! Now just to choose your spice from the websites by searching for “Crown Biltong Spice”.
Enjoy!!
Note: It’s probably a good idea to have your machine checked by an electrically qualified person, just to be safe.
Close up of fruit and berries lozenge different colors orange, dried apricot, raisins, walnuts, dried apples and kiwi on white background. Concept of healthy assorted dried fruit for snacks.
A few lessons I learnt to bear in mind when using this Arlec equipment:
1) The setup requires you to be near your Wifi router with Bluetooth enabled on your phone do any smart switch that is used to switch the heat source on and off. The fan should run continuously.
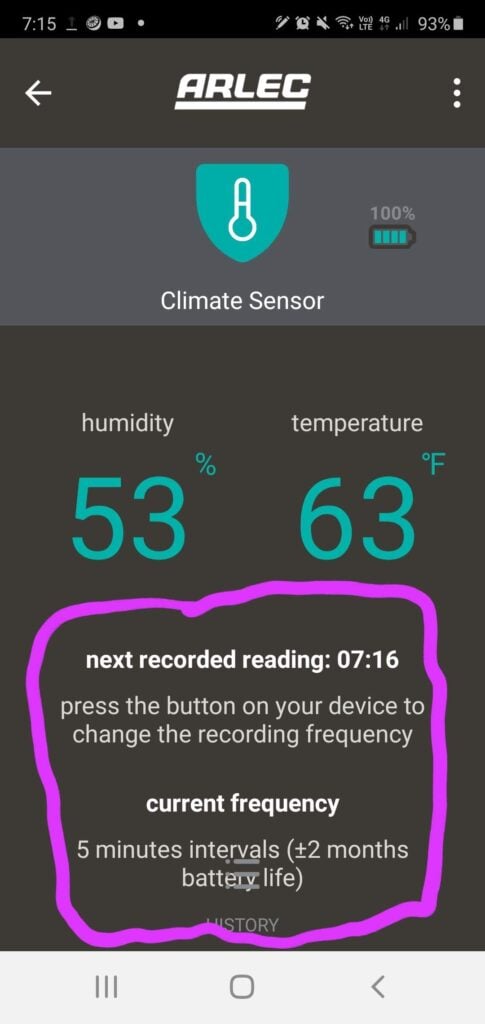
2) The temperature set points (corresponding to the values read from the Arlec Bluetooth enabled temp and humidity sensor are in by default in degrees Fahrenheit and not degrees Celsius). Change it to what you best understand, experiment with at what low temperature you want it to switch on and then at what high temperature you want it the switch off at. This depends on the humidity in your area, as the more humid the air, the more heat is required in the box to liberate the moisture into the air. Ideally, cool dry climates are great for only a fan to dry the food, but when there is substantial humidity in the air, heat and a fan are the only options.
3) The temp and humidity sensor update rate can be changed by pressing the little button on it and watching the frequency change from the default of 30 min down to 5 min.
Make sure the current frequency says 5 minutes
4) Most people struggle with getting the temp and humidity sensor to get registered with the App. It is important to press the button on this sensor for about 5 seconds until the red LED flashes rapidly and then to select Auto sync in the Smart Grid App on your phone.
A cool video of a great bunch of people who have a keen interest in building the machine using these exact parts is below. It actually is a heap of fun when you do this as a team, help each other out and treated it as bit of a “production line”:
A really nice South African actor that I watched growing up has now made some YouTube videos about the meat aspects of making biltong/beef jerky. He is an actor so will do the preparation better justice than me. I don’t use vinegar, as I don’t like the taste that it introduces into the final product. I only lay the raw meat in the biltong spice (Crown National – Safari Biltong Spice), which actually comprises: 1/3 part salt, 1/3 cracked brown pepper and 1/3 cracked dried coriander seeds. I lay it in a Pyrex dish, sprinkle half the spice over the one side of the meat, turn the meat over, sprinkle the other half of the spice on that side of the meat and then place that in the fridge for 24 hours with a cover of sandwich wrap (“Glad” wrap) to keep any other flavours within the fridge from permeating the meat – as he says “it isn’t rocket science”. Make sure that the “Glad” wrap doesn’t touch the meat and is pulled taut over the Pyrex dish. (Note: In Australia Jindurra steak costs only between AUD 13-20/kg depending on the cut and I have never had an issue with it: https://www.canstarblue.com.au/groceries/supermarket-meat-awards)
For dried fruit, look at the one about dried bananas.
Alternatively, the ‘secret sauce’ controller is a controller that can switch the heat source every few seconds, giving better control in making your dried foods. It also allows all interactions via Bluetooth from your mobile phone and if you connect to your local Wifi will show progress on a webpage, how cool is that! It also uses RF to control a plug socket so no electrical connections required. This is the state-of-the-art. If you want to buy a plug and controller it costs $100. Leave a comment we will get your details for an order. You are really going to love it! 👍🌟🍌🥩🍴
As an engineer (electrical and electronic) mathematics is an integral part of what we do (pun intended 😀)
I find it so sad when young people choose comfort over logic when making subject choices at school. I hear things like ‘I don’t like maths or physics’! They then later discover that they have an interest in a field of work which requires these very subjects. The path is then incredibly difficult for them to reach their aspirations.
Make no mistake, either of these subjects can be hard, especially if you parents had no interest in them at school and you have a school teacher that is also ‘no good’ in this space – as I had in a maths teacher in High School. Actually my high school as a whole, was pretty much a disaster. So even if life deals you a tough hand of cards persevere and you will eventually prevail.
I always loved science and chemistry but didn’t love mathematics due to a “shaky” introduction to the subject in high school. I consider myself an average bloke but have prevailed in my academic goals and love mathematics now!!
I was so impressed recently when I found a mini hi-fi system that a neighbour was throwing out, and came across the following video post that tells one how to trick a car’s CD player into accepting an auxiliary input and I thought that I could stream Spotify through this mini hi-fi system. (Note: always switch off the power and disconnect the plug socket before attempting this).
There were however, a few problems when I tried this with my newly “acquired” hi-fi unit:
The CD player on this unit was clearly the reason it was thrown out in the first place. Even though the radio still worked, it was an older Analog Radio, not the newer Digital Radio, which is abbreviated as DAB+. This older form of radio can be scratchy depending on reception, etc.
The unit had a tape player which had long since become obsolete.
I thus set about finding the “service manual” on the internet by looking for the model number, which is usually found on the back “nameplate” of the unit, and then searching for that name and service manual on the internet. You have got to love the internet and what is available on it!
I then had to look for the CD signals on the circuit diagram for the left and right channels on the various connectors, on this hi-fi unit, these were marked C/R-in, C/L-in and D-GND. I bought a good-quality auxiliary cable and cut it in half. I exposed the red (right channel), the white (left channel), and the shield/signal ground (“earth”). I then soldered these three conductors from the auxiliary cable to the purple-coloured points (shown on the diagram below) to the nearest solder points on the printed circuit board (PCB) by tracing them from the connector numbered CNP303 using a multimeter on the “buzzer” setting (continuity tester). The CD player had an issue, so the sound that came from connecting to these connection points was way too faint. I then decided I’d rather connect to the more generic signals which come from either the CD or the Cassette Player (abbreviated as “CASS” on the circuit diagram) or the Radio (abbreviated “RAD”). These are thus the yellow-coloured points on the circuit diagram named L-OUT and R-OUT, below:
As per the instructions in the YouTube video, if you use the CD player you have to “play” a blank CD in the CD player. When using the cassette player, you just have to push the Play button, and Voila, it works! High-quality digital music using the amplifier and great speakers from a hi-fi system that would end up in the landfill. I gave it a new lease on life! Sustainability at its best….
There was a bonus. Spotify allows one to have an old mobile phone connected to the same Wifi as your usual mobile phone and then allows you to direct that phone to play your music. I thus used my old mobile, connected to the same Wifi router as my current phone and then with the Auxiliary cable plugged into this old phone, I am now able to stream great music to this old phone. Sorry, but that was such a great revelation for me. I also now have a great use for old mobile phones, I can literally find an old radio/cassette player/CD player, connect that via an auxiliary cable (as above) to an old phone in every room in the house and with these connected to the same Wifi network. I thus have a museum of old technology serving a new purpose – bespoke music in every room with guests connecting to my Guest Wifi network, then able to stream their own choice of music in whichever room they find themselves. This is truly not wasting older technology, I am just repurposing it…..I love it, I hope you do too?!
Old museum-piece: CD-player/Tape cassette player and Analog radio, repurposed to work with Spotify streaming and have any guest send their choice of music to this old Wi-Fi-connected mobile phone
This was one of the more gratifying projects for me, as I feel it improves people’s comfort levels using technology and simultaneously saves the planet at the same time, without costing a cent!
My old Samsung mobile phone is the device in my study, which can be connected via Spotify by anybody on my guest Wifi network or even by me using my current mobile phone
I also installed the iHeartRadio App (https://www.iheart.com/) from the relevant app store for the operating system on your phone and then you have great local Australia radio stations to listen to and all digital, so no more scratchy radios 👍.
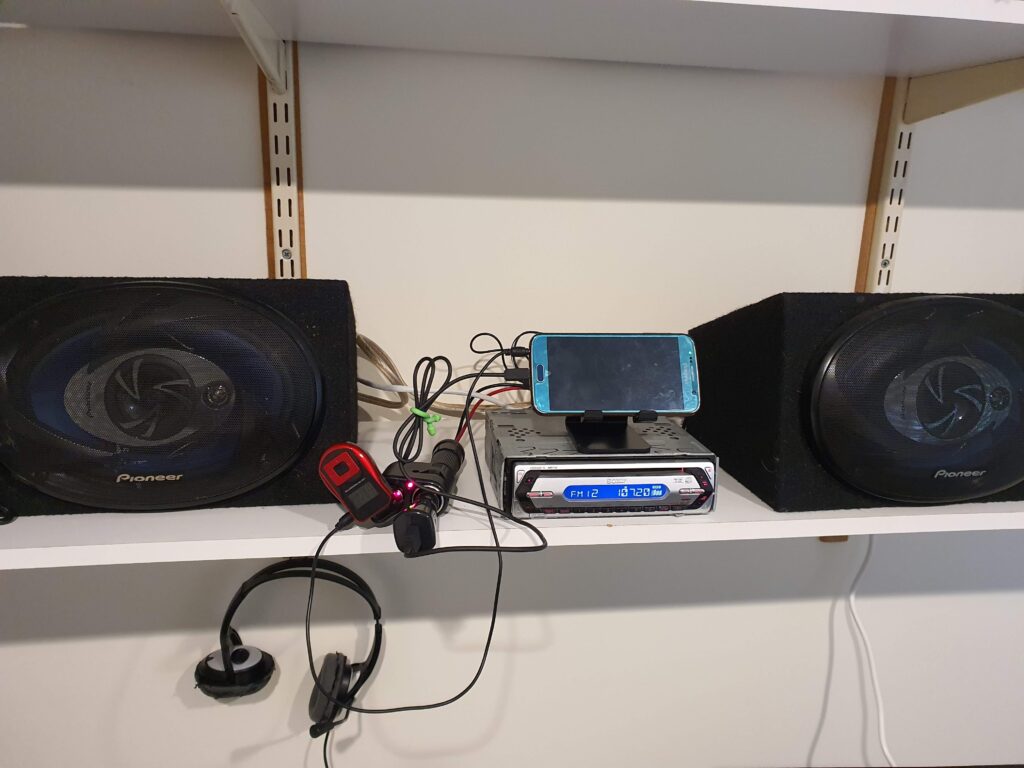
I loved this project so much that I took an old car radio, the Sony CDX-S2210S and “hacked” the output CD signals so that I could use this in my pool box as an entertainment area, sound system for around the pool. Again I found an old mobile phone and installed Spotify whilst including this phone within my family group. It obviously is connected to my guest wi-fi network.
A bit of a trick with this CD player is that it generates an error signal if you place a blank CD in the player. In this instance you actually have to use a playable music CD. The radio then attenuates the output from the actual CD player in favour of the hacked Aux. input signal. My wife had a coniption when the auxiliary cable disengaged out of the cellphone due to its cover messing with the seating of the connector and it played the CD rather than the Spotify signal. I may actually superglue the auxiliary cable into the mobile phone headphone port to prevent this from happening again 😜.
The auxillary cable soldered to the respective points on the PCB board (I again used the continuity tester to “buzz” the pins from the connector to the best solder points)
Just being able to repair any old machine using Arduino controllers is a great way to save the planet and save heaps of money, just read how a business card machine was repaired using a Arduino Mega 2560…so cool:
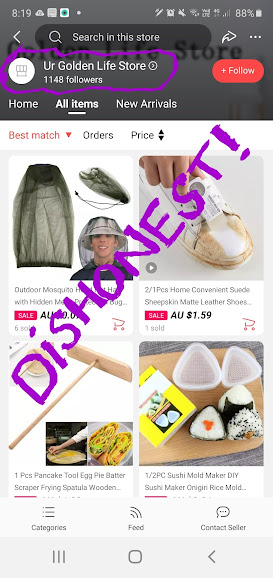
These sellers claim things about the product that simply aren’t true. It is just a child’s toy and is only worth about $5, nothing more. I have bought and tested them.
To compare the above prices of between $25 to $45 to the quality products from your local Bunnings/Home Depot is the first sign that all is not well with what these scammers are offering. To see what was fobbed off as a cleaner, is a YouTube Video of how this cleaner ‘worked’.