This is a question that comes up quite often when people are making biltong.
The truth is, it does give the biltong a ‘funny taste’ and in my experience is quite unnecessary, provided you follow two critical steps.
1) You need to leave the meat in the fridge in the biltong spices for about 48 hours so that a curing process takes place. The meat draws in the preserving salts and spices.
2) This step is very important as mould can form on the biltong if you haven’t used vinegar in the curing process. It is imperative that you monitor the humidity within the biltong Machine for the first 18 hours. This biltong machine should have enough heat generated within it in order to keep the internal humidity levels at 100%. This represents a situation where the air is saturated with moisture that is being drawn out of the meat. This process rapidly seals the outside of the meat, thereby preventing any mould, etc. I use the DHT22 sensor to monitor the internal humidity within the biltong Machine. The fan/s effectively vent this moist air out of the box, which is continuously being drawn out of the meat by the heat source.
I believe the vinegar was used prior to the invention of refrigeration, by the Voortrekkers in South Africa, in order to allow the curing of the meat to occur without any nasties coming into play. With the advent of a low-temperature environment in the cooling compartment of the refrigerator, this acidifying process is no longer required for the curing. The heat source is thus a must to quickly seal the outside of the cured meat. I hope this will give you confidence to try out a new way of enjoying an old South African favourite – Biltong.
The ‘secret sauce’ controller is a controller that can switch the heat source every few seconds, giving better control in making your dried foods. It also allows all interactions via Bluetooth from your mobile phone, and if you connect to your local Wifi will show progress on a webpage, how cool is that! It also uses RF to control a plug socket, so no electrical connections are required. This is the state-of-the-art. If you want to buy a plug and controller, it costs $100. Leave a comment we will get your details for an order. You are really going to love it! 👍🌟🍌🥩🍴🌟👍
I have a secret-sauce controller here that controls a plugged switched socket:
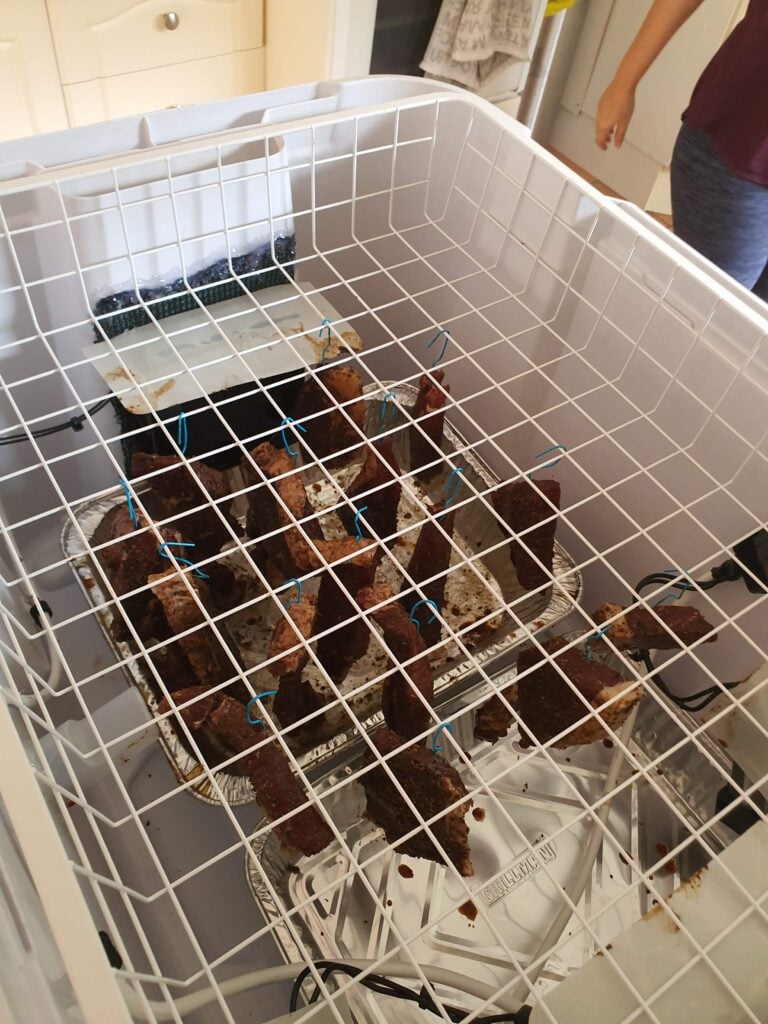
A delicacy called “Biltong” which makes use of different spices to “Jerky”
This is one of the best ways that one can start to make a difference to the planet, almost immediately!!! This is about focussing on living more sustainably. We have to eat, but we often buy much more than we can consume and throw away what begins to turn in our refrigerators. This is nothing short of wasteful, we are all guilty of this. More importantly, these desiccated food sources are actually all very delicious, think of: dried fruit, beef jerky, beef biltong and dried tomato on pizza. My favourites are biltong and dried banana…
The “heart” of the desiccator is the fan and associated PTC, “gentle”, self-regulating heater:
The side view which is the preferred position for resting on an old, upside down, plate saucer (preferably something ceramic) is shown below:
The bottom view (showing the fan unit) is shown below, this fan must face a 50cm diameter “air-port”:
Parts list
The items to get from your local hardware wholesaler, are as follows:
1) From Bunnings (AUS), Builder’s Warehouse (RSA), Home Depot (USA), etc. Get a good grade plastic container (relatively thick side-wall) that has a clip locking lid. This is important as the fan/heater creates positive pressure and needs to be sealed by these side clips. The dimensions are indicative and not crucial if you plastic container (box) is not exactly the same in size. Height – 0.5 m, Width – 0.5 m, Length – 1.02)
2) Get a “chocolate block electrical connector”, 230-240V, 10 Amp connector from the electrical aisle. These look like this:
3) My “secret sauce” controller, ESP32 Controller, (optional) if you want Bluetooth control from your mobile phone and monitoring of the internal desiccator temperature and humidity. Send me an email request for such a unit from the contact page on www.ianboake.com. This is not essential and only a ‘nice to have’. It will set you back about $USD 55 excluding shipping.
4) An old computer cord, preferably where somebody has stripped the insulation off the computer socket end, or ask the people at the Hardware store to make it look as in the picture below:
Note different countries have different plugs and colour codes for live/active, neutral and the ground or earth conductor
5) Shade cloth about 1-meter square will do, aluminium fly-screen is even better if you can get it:
6) A glue-gun to glue the shade cloth over the “air ports”. It is also possible to use duct tape to hold the screens over the “air-ports”.
7) Dowel rods cut to 550mm lengths by the hardware store, but at least 50mm longer than the width of the plastic box. eBay offers sets of 21mm diameter, dowel rods.
8) Four self-tapping screws to attach the fan/heater over one of the ports. 14g or 1.6mm will do.
Conversion between different self-taper screws in different countries
9) A 1mm drill to drill the “air ports” and pilot holes for the self-taper screws.
10) A pack of hangers, actually paper-clips where you twist the ends to make an accentuated s-shape
Instructions
1) Drill about 150 holes from the inside out in about a 50 cm diameter grouping. Do this in four places with one such an “air port” in the lid of the plastic box 2) Ensure that one “air-port” is covered by the fan of the heater/fan. The best way to do this is to take a piece of paper and mark the flange holes thereon using a pen. Place the unit onto an old plate and using a screwdriver mark the top left hole of the flange against the box. 3) Use the template in 2), mark the pilot holes for the heater/fan. 4) Make an “air-port” around these four holes but mark the key four anchoring holes with a marker 5) Cut the shade cloth large enough to cover the “air-ports”. 6) Using the glue-gun cover the “air-ports” with shade cloth by gluing the shade cloth to cover the 50 holes produced in 1) 7) Attach the heater/fan using the self-taper screws
8) Make a 22mm hole to pass the red/black and green cables from the heater unit to outside the box
9) Seal up the hole with the glue gun
10) Connect red to red or brown, yellow to black or blue and green/yellow to green/yellow earth using the “chocolate connector block”
11) Have an electrically qualified person check the connector and then wrap it in electrical insulation tape
12) Measure from the top of the plastic box a line about 10cm from the rim on both sides, mark it with a line. At 50cm spacings from the side one side of the plastic box, mark an X. Drill 22mm holes on these Xs for both sides of the plastic box.
13) Push the dowels into these holes until the protrusion are the same on both sides then glue the insides of the penetrations with the glue gun, this holds them in place.
14) The dowels will allow you to attach meat and fruit etc. to the dowels hanging in the box
15) Avoid hanging anything over the heater/fan, this will foul it over time making it less effective.
16) Google “Crown Biltong spice” and buy a packet of this spice, follow the instructions thereon for venison, lamb and beef. Hang the meat on the dowels using paperclips.
17) For fruit make a 20% mixture of lemon juice and water and dip these fruit slices therein before hanging up with paperclips.
18) Hang meat or fruit and check daily by hand squeezing the food until it feels hard with a semi-soft centre or when the “secret sauce” controllers report 40% humidity in the box, it will be sealed.
19) After 3-5 days depending on local climate, enjoy your sustainable, desiccated food!!
If you can find a basket that fits into the box it is much easier than dowels
A version with two fans and heaters can be seen in the following link:
Store in a brown paper packet and if you allow the centre to remain soft you can cut it with a serrated knife.
It is good to protect the whole setup with voltage and current appropriate fuses. In my case the LittleFuse Inc units are rated for 230V and I use a 3 amp fuse:
230V 5Amp Little Fuse Inc.
I posted a YouTube video to talk you through the build here:
Alternatively, The ‘secret sauce’ controller is a controller that can switch the heat source every few seconds, giving better control in making your dried foods. It also allows all interactions via Bluetooth from your mobile phone and if you connect to your local Wifi will show progress on a webpage, how cool is that! It also uses RF to control a plug socket so no electrical connections required. This is the state-of-the-art. If you want to buy a plug and controller it costs $100. Leave a comment we will get your details for an order. You are really going to love it! 👍🌟🥩🌟👍